Unit Tests are tests written with the most narrow scope possible. Definitionally, they test the smallest unit of our software possible, usually just a single method within a class.
Due to the fact that each test will have some context that must be set up, followed by an action whose result we wish to assert, followed by some assertions about the result, the Given-When-Then model has become a common one which we will follow in our examples below.
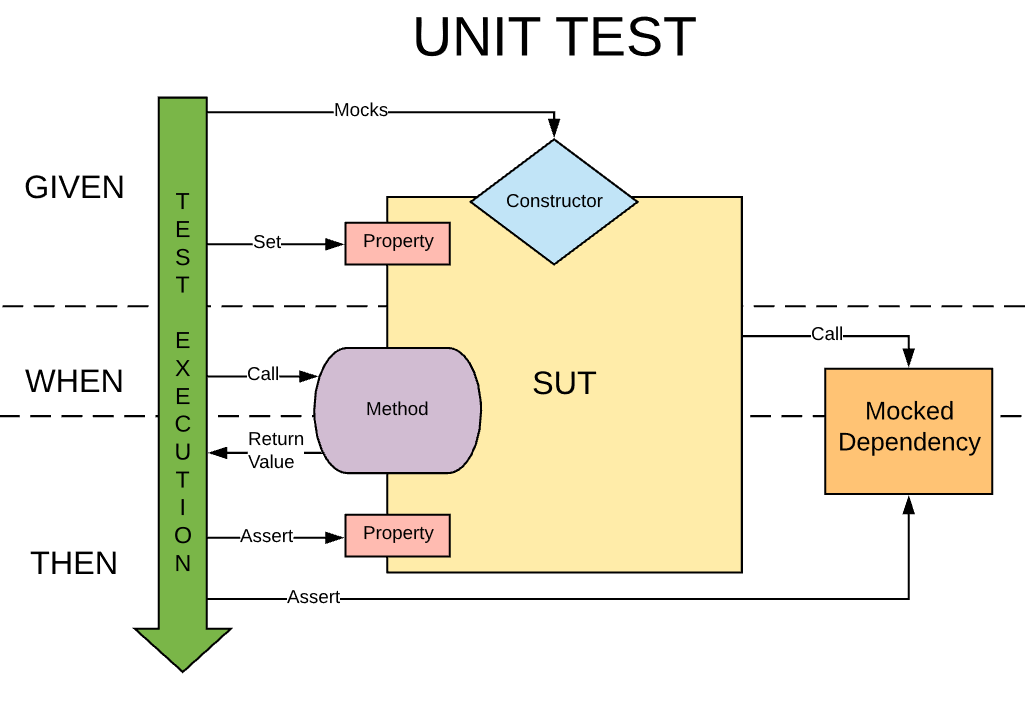
Given
During the Given step of our unit test, we will set up mocks of any dependencies that our System Under Test (SUT) depends on and provide them to it. One common way of doing this is through constructor injection, however this may also occur through property(setter) injection, or by registering mocks of our SUT’s dependencies in a Service Locator.
In this step, we will also take care of setting any properties or doing any setup method calls required to prepare our SUT for the unit test. We will also prepare any test data which will act as method arguments for the next step of our test.
When
The When step of our test is where we will actually invoke the method being tested, pass in any required test data as arguments to it, and capture the response value. At this point, the actual code we wish to test will execute, and it will take whatever action it normally would - with the exception that all of the other classes it might have interacted with (such as by calling methods in other classes) will actually be interacting with our mocks, which will become important in the final step.
Then
This is the final step in our test, where we will look at the publicly-visible properties of our SUT, the return value from the method we invoked in the When step, and also the interactions which occurred with our mocks to ensure that the result of our method call was as expected given then circumstances we were simulating with the setup in our Given step.
Example
Let’s look at one example of actual code that implements a working Unit Test. For the examples in this blog series we will be using C#, along with the XUnit test framework, and the Moq mocking library. However the tools we are using here have analogues in most object oriented languages, and the principles will apply to all testing.
First, let us take a look at our System Under Test - in this case we have a simple Client class which calls to a downstream dependency and then handles failures by ensuring that exception messages are logged, and then rethrowing the exception.
1
2
3
4
5
6
7
8
9
10
11
12
13
14
15
16
17
18
19
20
21
22
23
24
25
26
27
28
using System;

namespace XUnitTestProject1
{
    public class MyClient : IMyClient
    {
        private IMyLogger _logger;
        private IMyDependency _downstreamDependency;
        public MyClient(IMyLogger logger, IMyDependency dependency)
        {
            _logger = logger;
            _downstreamDependency = dependency;
        }

        public void DoTheThing(MyRequest request)
        {
            try
            {
                _downstreamDependency.Foo(request);
            }catch(Exception ex)
            {
                request.Failed = true;
                _logger.Log(ex.Message);
                throw;
            }
        }
    }
}
In our test, we wish to simulate a failure in a downstream dependency, and then assert that our class handles such a failure properly. This is a useful type of test since if we were to use the actual implementation of our dependency, it would often be difficult to manufacture a realistic failure on demand, but thanks to mocking our dependency, we can simply configure it to fail on demand.
1
2
3
4
5
6
7
8
9
10
11
12
13
14
15
16
17
18
19
20
21
22
23
24
25
26
27
28
29
30
31
32
33
34
35
36
37
using Moq;
using System;
using Xunit;

namespace XUnitTestProject1
{
    public class MyUnitTest
    {
        [Fact]
        public void GivenDownstreamFailure_DoTheThing_Rethrows()
        {
            // GIVEN
            var mockLogger = new Mock<IMyLogger>();
            var mockDependency = new Mock<IMyDependency>();
            var sut = new MyClient(mockLogger.Object, mockDependency.Object);
            var testException = new Exception("This is a test exception");
            mockDependency.Setup(x => x.Foo(It.IsAny<MyRequest>())).Throws(testException);
            var testRequest = new MyRequest();
            Exception expectedException = null;

            // WHEN
            try
            {
                sut.DoTheThing(testRequest);
            }catch(Exception ex)
            {
                expectedException = ex;
            }

            // THEN
            Assert.NotNull(expectedException);
            Assert.True(testRequest.Failed);
            mockDependency.Verify(x => x.Foo(It.IsAny<MyRequest>()), Times.Once);
            mockLogger.Verify(x => x.Log(It.Is<string>(y => y == testException.Message)), Times.Once);
        }
    }
}
On lines 13 and 14, we instantiate our mocks. Then we call the constructor of our SUT and provide these mocks as constructor arguments which get stored in private fields within our SUT. Then on line 17 we configure our mocked dependency to throw an exception any time the Foo method is called with any argument (It.IsAny<MyRequest>()) Finally we instantiate an expectedException property and initialize it to null so that we can later test that it has been set as we expected, proving that our exception was rethrown.
Next, we enter the “When” stage of our test, and invoke the DoTheThing method in our SUT, passing in our example MyRequest argument. While our method does not have a return value which is relevant in our test since we expect it to throw, we use a try/catch to capture the exception that is thrown in a similar way to how we might capture a method’s return value in a test in which our SUT does not throw.
Finally we reach the “Then” stage of our test, and we make a series of assertions that the result of our method call was as we expected. First, we assert that an exception was thrown by DoTheThing. Then we ensure that it was equal to our testException variable, and not some other Exception that our SUT may have created. Then we assert that the Failed property of our MyRequest argument passed to DoTheThing was set to true. Then we verify that our mocked dependency’s Foo method was called exactly once. And finally we verify that our mocked logger’s Log method was called exactly once and that the argument passed to it was exactly equal to the message provided to our testException during our “Given” stage.
Benefits of Unit Tests
Unit Tests have many benefits, but a primary benefit of writing unit tests is that it helps you view your code from the perspective of a developer who will have to use it, since as you are writing your code, you are also writing the unit tests that exercise most or all of its features. This encourages good best practices such as following SOLID principles. It also helps highlight when the complexity of your code is growing too large - a class which is difficult to properly test is almost certainly too complex and deserves to be refactored into a several simpler classes.
Another benefit of Unit Tests is one which seems trivial, and yet cannot really be understated: simply by reading our code and thinking through how we will test it, we will often find logic errors that might otherwise make it into our test environment and become more expensive to fix by taking up time from our QA personnel and being sent back to us later as a bug report when we are in the middle of other work.
The longer a bug exists, the more expensive it becomes to fix - something which we might have found in 5 minutes by writing a Unit Test may take a member of QA 15 minutes to write a bug ticket for, and then take a developer 30 minutes to open the codebase, follow the reproduction steps, and eventually isolate and fix it in code.
A final benefit of Unit Tests is that it provides a list of externally-observable behaviors of a given class which can be executed against any future versions of our class. This is a very useful tool to have when doing refactors of a class later on.
For example, imagine if a refactor of our SUT above changed its behavior such that instead of rethrowing the exception, it simply returned null. This might seem like reasonable behavior to the person refactoring our code, yet any code which uses our class has never had to check for null responses before, so this is actually a recipe for NullReferenceExceptions which might be painful and expensive to fix. Having a Unit Test like the one in our example in place will force the developer refactoring our code to fix the assertions in the test, which provides an important sanity check to realize that they have made important alterations to the way the code in our SUT should be consumed.
Code Coverage
A popular way of enforcing that a development team writes Unit and Integration Tests as a matter of course is to impose a code coverage Quality Gate into the CI/CD pipeline, often as a requirement when creating a new Build. This can be a useful tool to remind the development team to submit along with their new code, although caution should be used when using this metric, since high Code Coverage can be achieved by tautological tests which assert nothing of value just as it can be achieved by a suite of well-thought out tests that protect us against future defects.
It is important for the developers to understand the value of Unit Tests so that they can see the benefit to writing them without prompting. Then when such a Quality Gate blocks their attempt to build their code, they will understand that it is a safety mechanism protecting them from the possibility of future bug reports which might waste their time or that of their teammates, rather than a pointless impediment to their development efforts.